Working With Docs

1. Introduction

The LUGBZ Tech Docs are in a repository hosted on GitLab: https://gitlab.com/lugbz/docs

They are based on Antora and AsciiDoc and follow the well-known Docs-as-Code philosophy.

2. Online editing

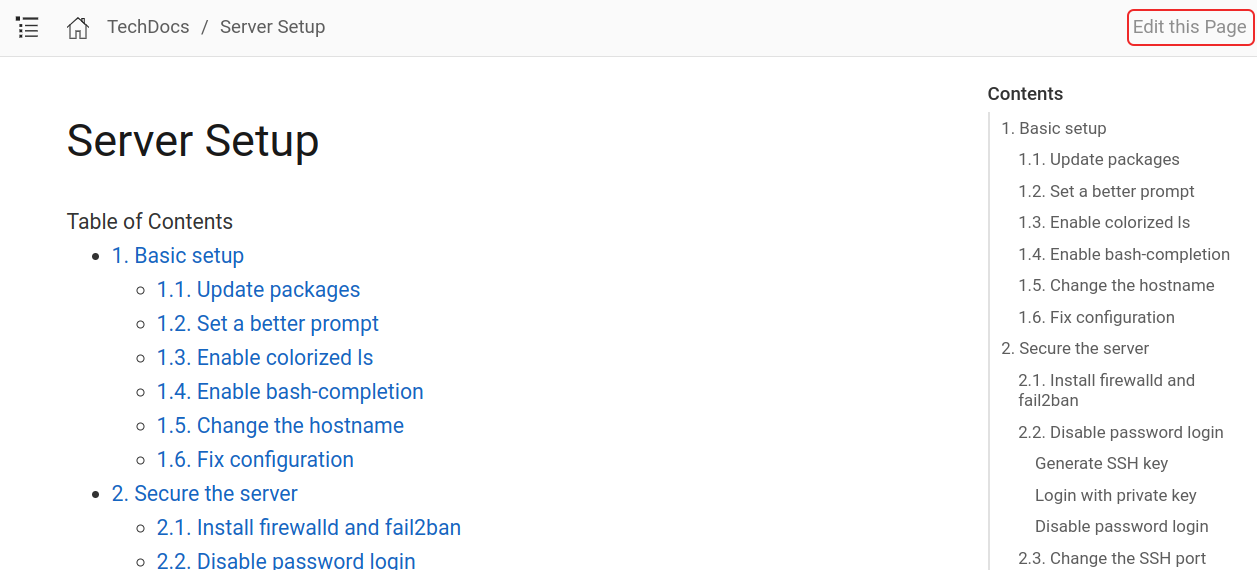
On the upper-right corner of the page there is a button "Edit this page". If clicked, it will open the corresponding page on the GitLab repo, in edit mode, as shown in the figure.
edit this page
edit page online

This is wiki-style editing, suitable for small corrections or suggestions. The syntax is of course AsciiDoc (we will see more about it later).

After making some modifications, you can make a commit and submit a merge-request.

3. GitLab pages

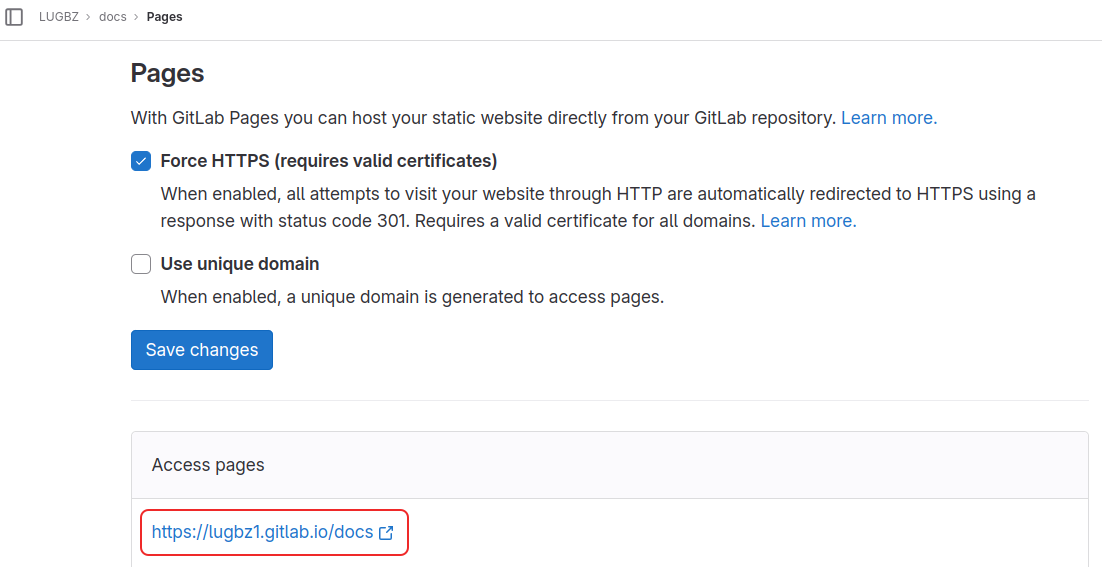
The docs are published on GitLab pages, at: https://lugbz.gitlab.io/docs/

This can be checked at "Deploy → Pages" on the GitLab menu.
gitlab pages

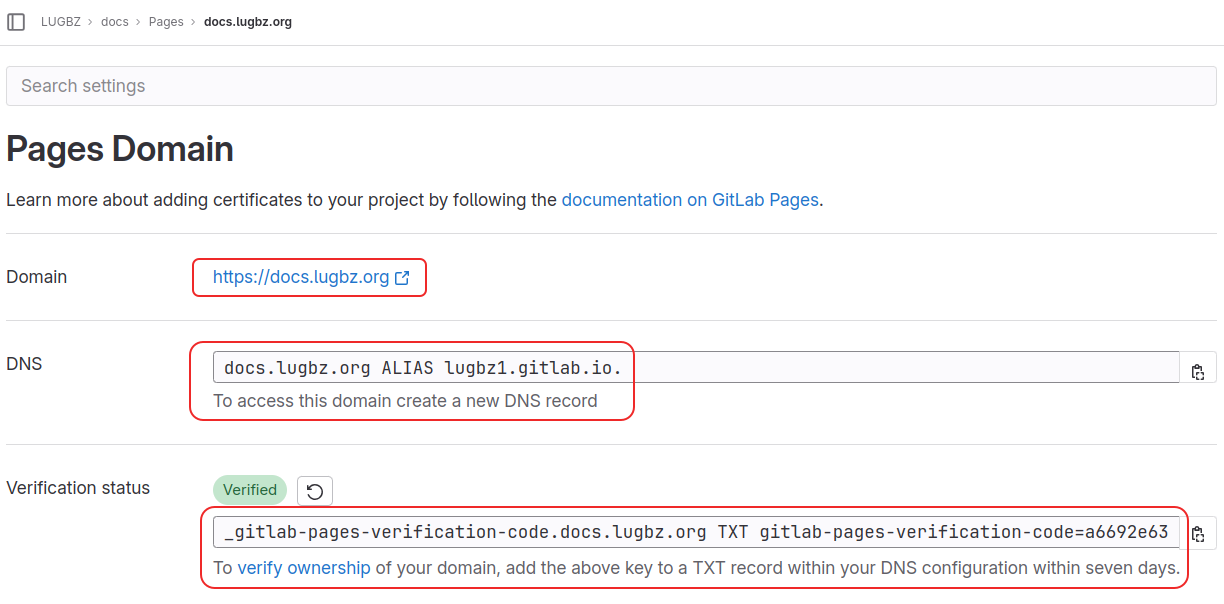
We can also add a custom domain, as shown in this screenshot:
add custom domain

For this, we are required to add an ALIAS and a TXT record on the custom domain, so that GitLab can verify that we really own this domain.

4. Auto-publishing

Whenever some changes are made, the published pages are updated automatically. How does this happen?

The key to understanding this is the file .gitlab-ci.yml, which instructs the CI/CD (Continuous Integration and Development) system of GitLab to do something whenever the content of the project is updated (for example some commits are pushed or a Merge Request is accepted).

The content of this file looks like this:

image: node        (1)

workflow:          (2)
  rules:
    - if: '$CI_COMMIT_BRANCH'

before_script:     (3)
  - npm install

pages:             (4)
  stage: deploy
  rules:
    - if: '$CI_COMMIT_BRANCH == "main"'
  script:
    - npx antora build.yml
  artifacts:
    paths:
      - public/

test:              (5)
  stage: test
  rules:
    - if: '$CI_COMMIT_BRANCH != "main"'
  script:
    - npx antora build.yml --log-failure-level=error
  artifacts:
    paths:
      - public/
1 The line image: node tells GitLab to start up a NodeJS Docker container. Implicitly, it also makes a clone of the repo inside this container.
2 The rules: in the workflow: part have the meaning: if changes are pushed to any branch.
3 Install the required NodeJS packages (dependencies), before running any scripts. They are listed in package.json:
package.json
{
  "devDependencies": {
    "@antora/cli": "3.0.1",
    "@antora/site-generator": "3.0.1"
  },
  "dependencies": {
    "@antora/lunr-extension": "^1.0.0-alpha.4"
  }
}
4 The part pages: is about generating the GitLab pages for this project. The content of the field shows how to do it. Basically, in plain English, it says something like this:
  • If there is a commit to the branch "main",

  • run the command: npx antora build.yml

  • This command is supposed to generate the static pages on the directory public/, so, publish the content of this directory.

5 The section test: is very similar to pages:, but it is triggered only when there is a commit on a branch different from "main", and the command that is executed in this case has the additional option --log-failure-level=error.

The purpose of this section is to test the modifications that are proposed in a merge-request. If the command runs without errors, the test is passed, otherwise the test fails. If the test fails, this is an indication that there is something to be fixed (maybe a wrong AsciiDoc syntax, or something else) before the merge-request can be accepted.

You can check the page "Build → Pipelines" (on the GitLab menu) to see more details about pipelines and their status. This can be very useful especially when a job has failed, because you can also check the log messages and hopefully find out what was the problem.

5. Working locally

The best way for working with the docs is to make a local clone of the repo and to use your own preferred editor.

5.1. Installation

  1. Make a clone of the docs repo:

    git clone https://gitlab.com/lugbz/docs
    cd docs/
  2. Install nvm (we need it for installing and managing NodeJS):

    wget -qO- https://raw.githubusercontent.com/nvm-sh/nvm/v0.39.5/install.sh | bash
    source ~/.bashrc
    command -v nvm
  3. Install the latest Node LTS release:

    nvm install --lts
    node --version
  4. Install antora packages:

    npm install
    npx antora -v

Now we can generate the static HTML pages of the docs with a command like this:

npx antora build-dev.yml

However, before doing this, we should modify a little bit the file build-dev.yml. The content of this file is like this:

site:
  title: TechDocs
  url: /home/dasho/Downloads/lugbz-techdocs    (1)
  start_page: ROOT::index.adoc

content:
  sources:
  - url: .
    branches: HEAD
    start_path: .

antora:
  extensions:
  - require: '@antora/lunr-extension'
    index_latest_only: true

ui:
  bundle:
    #url: https://gitlab.com/antora/antora-ui-default/-/jobs/artifacts/master/raw/build/ui-bundle.zip?job=bundle-stable
    #url: https://github.com/mulesoft/docs-site-ui/releases/download/prod-28/ui-bundle.zip
    url: ./ui-bundle.zip
    snapshot: true
  supplemental_files: ./ui-supplemental
  output_dir: ui

asciidoc:
  attributes:
    page-pagination: true

runtime:
  cache_dir: ./.cache/

output:
  dir: ~/Downloads/lugbz-techdocs    (2)
1 This is the absolute path of the directory where the HTML docs are generated.
2 This is the path (absolute or relative) of the directory where the HTML docs are generated.

5.2. Editing

The content of the docs is located at modules/ROOT/. We can edit them with our preferred editor (for me it is Emacs).

Antora is designed to support complex documentation projects, with multiple modules and multiple release versions. This is the reason for the somewhat "complicated" directory structure. We are just using a small subset of its features, for a simple documentation project.

The file nav.adoc in this directory is the navigation file. It is displayed as the menu on the left panel. It also defines the buttons "Next" and "Previous" at the end of each page. Whenever we add a new page to the docs, it is recommended to add it to the navigation list as well.

The directory pages/ contains the documentation pages (in AsciiDoc format), and the directory images/ contains the images that are referenced from these pages.

Whenever we make some changes to the docs, we should also run npx antora build-dev.yml to regenerate the HTML pages, and then open them on the browser (or just reload the browser tab) in order to check the effect of our changes.

This is similar to programming: we make some changes, then we recompile and test the program, to make sure that we have not introduced any bugs and the program works as expected.

We can also use the script utils/watch.sh (start it in another terminal tab). It will automatically rebuild the docs whenever we save some changes (but we still have to reload the HTML page manually, usually with Ctrl+r).

utils/watch.sh
#!/bin/bash
# Watch for modifications and rebuild the dev docs automatically.
# Depends on inotify-tools (apt install inotify-tools)

cd $(dirname $0)
cd ..

inotifywait -qmr -e modify --exclude '\.?#.*' modules/ \
  | while read event; do
      echo $(date +'%F %T') $event
      npx antora build-dev.yml
    done

5.3. Commit workflow

The preferred way for submitting changes to the docs is:

  • create a new branch

  • add commits to it

  • submit a merge-request

For example:

git checkout -b changes-to-the-docs

# make changes, test and commit

git push origin changes-to-the-docs

# go to https://gitlab.com/lugbz/docs
# and create a merge request

# make some more changes and commits

# push again:
git push origin changes-to-the-docs

Finally, after the merge-request has been accepted:

git checkout main
git pull --prune
git branch -a
git branch -d changes-to-the-docs
Sometimes the option -D is required, instead of -d, in order to delete the branch.

6. Examples

To get some familiarity with Antora and AsciiDoc, it is useful to have a look at the code of some pages, and see how they are rendered to HTML.

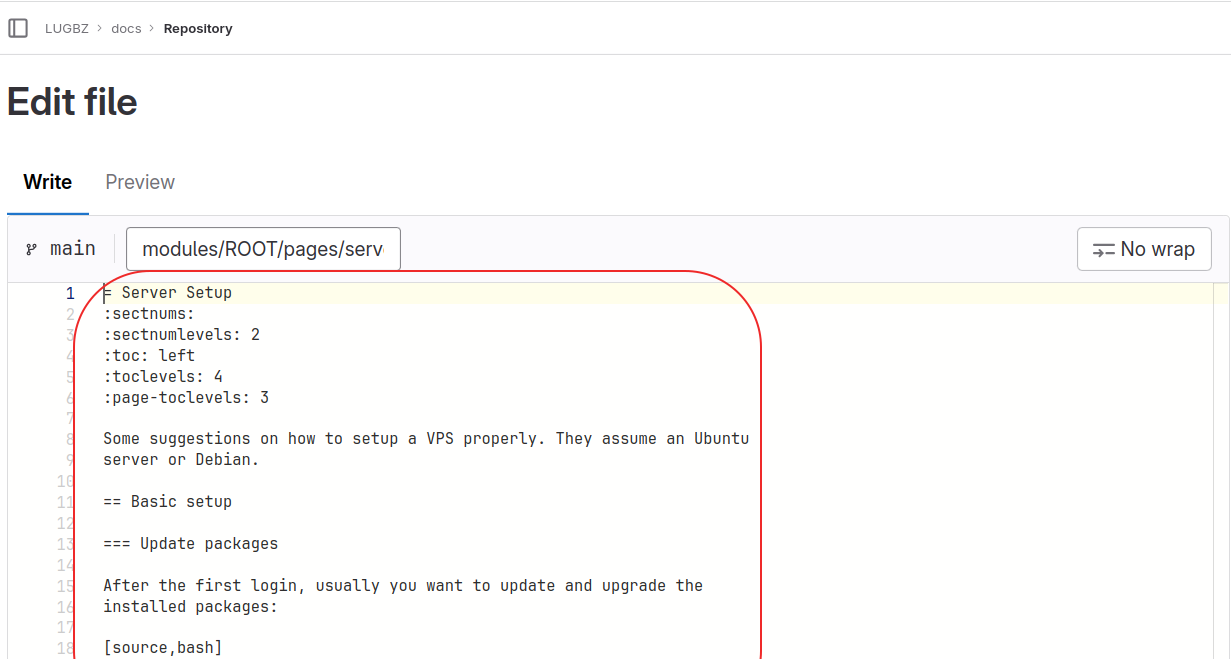
  1. Web page: Server Setup

    AsciiDoc code: server-setup.adoc
    = Server Setup
    :sectnums:
    :sectnumlevels: 2
    :toc: left
    :toclevels: 4
    :page-toclevels: 3
    
    Some suggestions on how to setup a VPS properly. They assume an Ubuntu
    server or Debian.
    
    NOTE: See also this:
    https://docker-scripts.gitlab.io/howto/dedicated-rootserver.html#_setup[window=_blank]
    
    == Basic setup
    
    === Update packages
    
    After the first login, usually you want to update and upgrade the
    installed packages:
    
    [source,bash]
    ----
    apt update
    apt upgrade --yes
    
    apt install vim tmux git
    
    # do also a reboot, in case the kernel is updated
    reboot
    ----
    
    
    === Set a better prompt
    
    The default prompt is usually dull and boring, and a nice prompt makes
    your work easier. So let's try to improve it:
    
    [source,bash]
    ----
    # customize ~/.bashrc
    sed -i ~/.bashrc \
        -e '/bashrc_custom/d'
    echo 'source ~/.bashrc_custom' >> ~/.bashrc
    
    cat <<'EOF' > ~/.bashrc_custom
    # set a better prompt
    PS1='${debian_chroot:+($debian_chroot)}\[\033[01;31m\]\u\[\033[01;33m\]@\[\033[01;36m\]\h \[\033[01;33m\]\w \[\033[01;35m\]\$ \[\033[00m\]'
    EOF
    ----
    
    We have created the file [path]`~/.bashrc_custom`, which we _source_
    (include) at the end of [path]`~/.bashrc`.
    
    
    === Enable colorized ls
    
    In Debian we should enable colorized ls output (on Ubuntu it is
    enabled by default). Edit [path]`~/.bashrc` and uncomment `ls`
    aliases.
    
    [source,bash]
    ----
    sed -i ~/.bashrc \
        -e 's/^# export LS_OPTIONS/export LS_OPTIONS/' \
        -e '/dircolors/ s/^# eval/eval/' \
        -e 's/^# alias ls=/alias ls=/' \
        -e 's/^# alias ll=/alias ll=/' \
        -e 's/^# alias l=/alias l=/'
    ----
    
    === Enable bash-completion
    
    Strange, but on an Ubuntu server it is not enabled by default (in
    Debian it is already enabled).
    
    [source,bash]
    ----
    # make sure that bash-completion is installed
    apt install --yes bash-completion
    
    cat <<'EOF' >> ~/.bashrc_custom
    # enable programmable completion features
    if [ -f /etc/bash_completion ] && ! shopt -oq posix; then
        source /etc/bash_completion
    fi
    EOF
    ----
    
    
    === Change the hostname
    
    Edit [path]`/etc/hostname`, change the hostname, and [in]`reboot`.
    
    Instead of rebooting you can also run [in]`hostname newhostname`, then
    [in]`exit` and re-login.
    
    === Fix configuration
    
    In Linux everything is a file, and if you install lots of containers
    and applications, the number of files that need to be opened
    increases.  Make sure that the limit of open files is not small:
    
    [source,bash]
    ----
    cat /proc/sys/fs/file-max
    echo 9223372036854775807 > /proc/sys/fs/file-max
    ----
    
    To make this change permanent, edit the file [path]`/etc/sysctl.conf`
    and append a line like this:
    
    [source]
    ----
    fs.file-max = 9223372036854775807
    ----
    
    Then enable it with [in]`sysctl -p`.
    
    
    == Secure the server
    
    === Install firewalld and fail2ban
    
    Let's try to protect the server from the attacks.
    
    [source,bash]
    ----
    # install firewalld
    apt install --yes firewalld
    firewall-cmd --list-all
    firewall-cmd --permanent --zone=public --set-target=DROP
    firewall-cmd --reload
    
    # install fail2ban
    apt install --yes fail2ban
    fail2ban-client status
    fail2ban-client status sshd
    ----
    
    Their default configuration is usually fine, so for the time being we
    don't need to change anything.
    
    
    === Disable password login
    
    If you are using a password to login to the server, it is strongly
    recommended to enable key-based login and to disable password login.
    
    ==== Generate SSH key
    
    Generate e SSH key pair on the server, like this:
    
    [source,bash]
    ----
    ssh-keygen --help
    ssh-keygen -t ecdsa -q -N '' -f server-admin
    ----
    
    It will create the files [path]`server-admin` (the private key) and
    [path]`server-admin.pub` (the public key). The option [opt]`-N ''`
    tells to the command [cmd]`ssh-keygen` to generate a key pair without
    password.
    
    We want to append the public key to [path]`~/.ssh/authorized_keys`, but
    first let's make sure that the directory exists and has propper
    permissions:
    
    [source,bash]
    ----
    mkdir -p ~/.ssh
    chmod 700 ~/.ssh
    touch ~/.ssh/authorized_keys
    chmod 600 ~/.ssh/authorized_keys
    cat server-admin.pub >> ~/.ssh/authorized_keys
    rm server-admin.pub
    ----
    
    ==== Login with private key
    
    We want to transfer the private key to our local machine (laptop). We
    can just copy/paste its content or we can use [cmd]`scp` like this:
    
    [source,bash]
    ----
    scp root@10.11.12.13:~/server-admin .
    chmod 600 server-admin
    ssh root@10.11.12.14 rm server-admin
    ----
    
    Now let's try to login using this private key:
    
    [source,bash]
    ----
    ssh -i server-admin root@10.11.12.13
    ----
    
    You should be able to login without a password.
    
    To make things easier, let's create a configuration file on
    [path]`~/.ssh` (on the local machine):
    
    [source,bash]
    ----
    touch ~/.ssh/config
    chmod 600 ~/.ssh/config
    
    cat >> ~/.ssh/config <<EOF
    Host server1
        HostName 10.11.12.13
        Port 22
        User root
        IdentityFile ~/.ssh/server1.key
        IdentitiesOnly yes
    EOF
    
    mv server-admin ~/.ssh/server1.key
    chmod 600 ~/.ssh/server1.key
    ----
    
    Now you should be able to login to the server just by giving [in]`ssh
    server1`. You don't need to remember the IP of the server, the port,
    the identity file (private key), etc. It's so convenient!
    
    ==== Disable password login
    
    Now that we can login with an identity file (private key), we can
    disable the password login on the server, to make it more
    secure. Someone may guess a password, or may find it by a brute force
    attack (trying lots of passwords), but it is almost impossible to
    guess or find a private key.
    
    Edit the file [path]`/etc/ssh/sshd_config` on the server and make sure
    to change the setting `PasswordAuthentication` from *yes* to *no*:
    
    ----
    #PasswordAuthentication yes
    PasswordAuthentication no
    ----
    
    Save the file and restart the *sshd* service:
    [source,bash]
    ----
    systemctl restart sshd
    ----
    
    Make sure that you can still login with the private key.
    
    Test also that you cannot login with a password anymore.
    
    === Change the SSH port
    
    This is another step for making the server a bit more secure.
    
    - Edit [path]`/etc/ssh/sshd_config` on the server and change the port
    from 22 to something else (for example with 4 or 5 digits), like this:
    +
    ----
    #Port 22
    Port 1234
    ----
    
    - Open the new port in the firewall:
    +
    [source,bash]
    ----
    firewall-cmd --zone=public --add-port=1234/tcp
    ----
    
    - Restart the SSH service
    +
    [source,bash]
    ----
    systemctl restart sshd
    ----
    
    - Change the port in [path]`~/.ssh/config` on the local machine and
    test that you can still login to the server.
    
    - Make the firewall change permanent:
    +
    [source,bash]
    ----
    firewall-cmd --permanent --zone=public --add-port=1234/tcp
    firewall-cmd --permanent --zone=public --remove-service=ssh
    ----
    
    === Use a script to login
    
    The configuration file [path]`~/.ssh/config` is convenient, but if you
    want to login to the server from anywhere, you need something more
    portable. In this case you can use a script like this:
    
    [source,bash]
    ----
    #!/bin/bash
    
    server=10.11.12.13
    port=1234
    
    keyfile=$(mktemp)
    sed -n -e '/^----/,/^-----/p' $0 > $keyfile
    
    ssh -i $keyfile -p $port root@$server
    
    rm -f $keyfile
    exit 0
    
    -----BEGIN OPENSSH PRIVATE KEY-----
    b3BlbnNzaC1rZXktdjEAAAAABG5vbmUAAAAEbm9uZQAAAAAAAAABAAAAaAAAABNlY2RzYS
    1zaGEyLW5pc3RwMjU2AAAACG5pc3RwMjU2AAAAQQRIRkXtvwyUiLDSLSqV0V0RClTakKDt
    SkP/4besU++elsvtZaaY97GSdn0kTqF+0LiBCTOaEROgRHB7aKU8YjwjAAAAqJKniRSSp4
    kUAAAAE2VjZHNhLXNoYTItbmlzdHAyNTYAAAAIbmlzdHAyNTYAAABBBEhGRe2/DJSIsNIt
    KpXRXREKVNqQoO1KQ//ht6xT756Wy+1lppj3sZJ2fSROoX7QuIEJM5oRE6BEcHtopTxiPC
    MAAAAhAJXThzR7EhbYn9fykJaG5hUA4h+RCfIkpwo83yl+r/5qAAAADmRhc2hvQGRhc2hh
    bWlyAQ==
    -----END OPENSSH PRIVATE KEY-----
    ----
    
    It includes the IP and the port along with the private key (identity
    file), so that you don't have to remember them. If this script is
    called [path]`server1.sh`, make sure to give it the right permissions,
    like this:
    
    [source,bash]
    ----
    chmod 700 server1.sh
    ----
    
    You may also consider using something like these scripts:
    https://gitlab.com/dashohoxha/server-scripts
    
    
    == Install docker
    
    See: https://docker-scripts.gitlab.io/howto/install-docker.html[window=_blank]
  2. Web page: Simple and minimal SMTP server

    AsciiDoc code: simple-smtp-server.adoc
    = Simple and minimal SMTP server
    :toc:
    :sectnums:
    
    == Introduction
    
    Web applications usually need to send email notifications. For example
    Moodle needs to notify students and teachers about various
    events. Without being able to send notifications, Moodle and many
    other web applications loose half of their usefulness. On many web
    applications you cannot even finish the registration process and
    cannot login, unless you verify your email address (the application
    sends you an email with a link that you have to click).
    
    To send emails, an application needs to contact by SMTP a local or
    remote mail server. Installing a mail server locally is not so easy
    because it needs also some DNS and other configurations. Otherwise the
    mails that are sent will end up being classified as spam and most
    probably will not reach the recipient.
    
    This article describes how to install your own mail server and how to
    configure it properly. The aim of this mail server is not to be a
    full-fledged system, where users can have accounts and use it daily,
    but just to support web applications (like Moodle) with sending
    notifications.
    
    For security resons, it allows only some trusted hosts to send
    emails. This prevents any spammers from abusing it. It also does not
    have any local accounts and does not accept any emails, making it
    simpler -- no need for antispam and antivirus software, no need for
    POP and IMAP, etc. It is just a simple and minimal SMTP server, which
    can be used by (trusted) web applications to send notification emails
    to their users.
    
    == Minimal DNS configuration
    
    In order to build a mail server you need to own a domain (say
    `example.org`) and be able to customize its DNS records.
    
    For each email domain you need something like this on the DNS
    configuration:
    
    ----
    smtp.example.org.    IN    A           10.11.12.13
    example.org.         IN    MX    10    smtp.example.org.
    example.org.         IN    MX    20    smtp.example.org.
    example.org.         IN    TXT         "v=spf1 mx -all"
    ----
    
    NOTE: Yes, both MX records point to the same server, it is not a typo.
    It is done because the configuration of the server enables postscreen
    deep protocol tests in order to block spambots (for more details see
    https://www.linuxbabe.com/mail-server/configure-postscreen-in-postfix-to-block-spambots[this
    article]). This means that the server disconnects new/unknown SMTP
    clients when they connect for the first time, even if they are
    legitimate. A legitimate client usually goes on to try the second
    mailserver in the list, and the second time they try to connect they
    are accepted.
    
    The last line basically tells to the other SMTP servers that only this
    server is allowed to send emails on behalf of this domain, and no other
    servers. This is done to prevent spammers from faking your email
    addresses. If a spammer tries to send a mail as if it is coming from
    your domain, the SMTP server that is getting this email will consult
    this DNS record and will figure out that the server of the spammer is
    not allowed to send emails on behalf of `example.org`.
    
    Depending on your DNS server, DNS changes may take from a few minutes to
    a couple of days to propagate. You can use `dig` to verify that these
    DNS records have been activated:
    
    [subs="+quotes"]
    ....
    [prompt]*user@host:~$* [in]*dig MX example.org +short*
    10 smtp.example.org.
    20 smtp.example.org.
    
    [prompt]*user@host:~$* [in]*dig A smtp.example.org +short*
    10.11.12.13
    
    [prompt]*user@host:~$* [in]*dig TXT example.org +short*
    "v=spf1 mx -all"
    ....
    
    == Build a postfix container
    
    We assume that we have already installed **docker-scripts** and
    **revproxy**.  Now let's install a
    https://gitlab.com/docker-scripts/postfix[postfix^] container:
    
    [source,bash]
    ----
    ds pull postfix
    ds init postfix @smtp.example.org
    cd /var/ds/smtp.example.org/
    vim settings.sh    (1)
    ds make
    ----
    <1> Make sure to set proper values to [var]`HOSTNAME` and
    [var]`VIRTUAL_DOMAINS`.
    
    Check the installation:
    
    [source,example]
    ----
    cd /var/ds/smtp.example.org/
    
    ls sslcert/
    ls /etc/cron.d/
    
    ls config/
    cat config/trusted_hosts
    cat config/virtual_alias_maps
    cat config/virtual_alias_maps.regexp
    ls config/dkim-keys/
    
    ds shell
    ps ax
    systemctl status postfix
    ls /etc/postfix/
    postconf -nf | less
    tail /var/log/mail.log
    exit
    ----
    
    == Make the mail server trustworthy
    
    To increase the chances that the other mail servers take seriously the
    emails comming from our mailserver we have to do some extra DNS
    configurations. Otherwise the mails that are sent may end up being
    classified as spam and most probably will not reach the recipient.
    
    === Activate a DKIM key
    
    https://en.wikipedia.org/wiki/DomainKeys_Identified_Mail[DKIM] keys
    are used by a mail server to sign the emails that it sends, so that
    the emails cannot be changed in transit, and so that the receiver can
    verify that this server is authorized to send emails for a domain. It
    is an important tool against spams and faked emails. If an smtp server
    signs the messages that it sends, it is less likely that they will be
    classified as spam.
    
    Installation scripts generate a DKIM key as well, which is on
    [path]`config/dkim-keys/example.org/`. To activate it you need to add
    a record like this on the DNS configuration of the domain:
    
    ....
    mail._domainkey.example.org.  IN  TXT  (
        "v=DKIM1; h=sha256; k=rsa; "
        "p=MIIBIjANBgkqhkiG9w0BAQE....kMJdAwIDAQAB"
    )
    ....
    
    You can find the content of the public key on the file:
    [path]`config/dkim-keys/example.org/mail.txt`.
    
    To check whether it has been activated or not, try the command:
    
    [source,bash]
    ----
    dig TXT mail._domainkey.example.org +short
    ----
    
    === Create a DMARC record
    
    https://postmarkapp.com/support/article/892-what-is-dmarc[DMARC] is a
    standard that allows you to set policies on who can send email for
    your domain based on DKIM and SPF.
    
    You can add a DMARC Record on DNS that will allow you to get weekly
    reports from major ISPs about the usage of your email domain.
    
    . Go to http://dmarc.postmarkapp.com/ and add your email address where
    you want to receive reports, and email domain name (`example.org`).
    
    . On the DNS configuration of the domain add a TXT record like this:
    +
    ....
    _dmarc.example.org.  IN  TXT  (
        "v=DMARC1; p=none; pct=100; "
        "rua=mailto:re+x2i0yw1hoq7@dmarc.postmarkapp.com; "
        "sp=none; aspf=r;"
    )
    ....
    +
    The value of this TXT record is the one generated by the website
    above.
    
    . To check that it has been activated, try the command:
    +
    [source,bash]
    ----
    dig TXT _dmarc.example.org. +short
    ----
    
    == Test the SMTP server
    
    For a quick automated test of the basic functionality of the server
    try: [cmd]`ds test1`. The following tests can be done manually.
    
    === Send from inside
    
    Let's send some test emails from inside the container.
    
    .Send to an existing account
    ====
    [source,bash,subs="+quotes"]
    ----
    cd /var/ds/smtp.example.org/
    ds shell
    
    swaks --from noreply@example.org --to ##info@example.org##
    tail /var/log/mail.log
    
    cat /host/config/virtual_alias_maps
    cat /host/config/virtual_alias_maps.regexp
    ----
    ====
    
    This test succeeds because the recipient (`##info@example.org##`)
    matches the line `/^info@/` on the
    [path]`virtual_alias_maps.regexp`. The sender can be anything (in this
    case `noreply`) and the email will still be sent, since we are sending
    from localhost, which is a trusted host.
    
    This email is actually forwarded to the address that is listed on
    [path]`virtual_alias_maps.regexp` (check also the spam folder if you
    cannot find it on the inbox).
    
    .Send to a non-existing account
    ====
    [source,bash,subs="+quotes"]
    ----
    swaks --from info@example.org --to ##noreply@example.org##
    tail /var/log/mail.log
    ----
    ====
    
    This test fails because the recipient (`##noreply@example.org##`) does
    not match any entry on [path]`virtual_alias_maps` or
    [path]`virtual_alias_maps.regexp`, so the mailserver does not know
    what to do with this email.
    
    ****
    [TIP]
    ====
    If you edit [path]`virtual_alias_maps` and add a line like this:
    
    [subs="+quotes"]
    ....
    ##noreply@example.org## user@mail.com
    ....
    
    then the second test will succeed as well and the email will be
    forwarded to the given address. But first you will have to update the
    map with:
    
    [source,bash]
    ----
    postmap /host/config/virtual_alias_maps
    ----
    ====
    ****
    
    === Send to gmail
    
    Let's send test emails to a gmail account:
    
    .Send from an existing address
    ====
    [source,bash,subs="+quotes"]
    ----
    swaks --from ##info@example.org## --to <username>@gmail.com -tlso
    tail /var/log/mail.log
    ----
    ====
    
    .Send from a non-existing address
    ====
    [source,bash,subs="+quotes"]
    ----
    swaks --from ##noreply@example.org## --to <username>@gmail.com -tlso
    tail /var/log/mail.log
    ----
    ====
    
    Both of these tests will succeed. The option [opt]`-tlso` enables the
    TLS encryption of the connection.
    
    On gmail use "Show original" from the menu, to see the source of the
    received email.
    
    NOTE: You can also send a reply from `**<username>@gmail.com**` to
    `**info**`, but you cannot send to `**noreply**`.
    
    === Send from the host
    
    Let's try to send a test email from the host (outside the container):
    
    ====
    [source,bash,subs="+quotes"]
    ----
    cd /var/ds/smtp.example.org/
    apt install swaks
    
    swaks --from ##info##@example.org --to ##admin##@example.org -tlso
    ds exec tail /var/log/mail.log
    ----
    ====
    
    It may fail, because the IP of the host might not be on the list of
    the trusted hosts. Append it to [path]`config/trusted_hosts` and run
    [cmd]`ds inject update.sh`. Then verify that now it works:
    
    ====
    [source,bash,subs="+quotes"]
    ----
    echo '10.11.12.13' >> config/trusted_hosts
    ds inject update.sh
    
    swaks --from ##info##@example.org --to ##admin##@example.org -tlso
    ds exec tail /var/log/mail.log
    ----
    ====
    
    === Add a new address
    
    Try to send an email to `##test1##@example.org`:
    
    ====
    [source,bash,subs="+quotes"]
    ----
    swaks --from info@example.org --to ##test1@example.org## -tlso
    ----
    
    [subs="+quotes"]
    ....
    ...
    <** 550 5.1.1 <test1@example.org>: ##Recipient address rejected:##
                              ##User unknown in virtual alias table##
    ...
    ....
    ====
    
    It will fail because the recipient does not exist on the alias
    table. On [path]`config/virtual_alias_maps` add a line like this:
    
    [subs="+quotes"]
    ....
    ##test1@example.org##  <username>@gmail.com
    ....
    
    Then update the alias db and verify that now you can send email to
    this address:
    
    ====
    [source,bash]
    ----
    #ds inject update.sh
    ds exec postmap /host/config/virtual_alias_maps
    
    swaks --from info@example.org --to test1@example.org -tlso
    ds exec tail /var/log/mail.log
    ----
    ====
    
    === Send to ports `587`/`465`
    
    ====
    [source,bash,subs="+quotes"]
    ----
    swaks ##--server smtp.example.org:587## \
          --from info@example.org --to admin@example.org
    ----
    ====
    
    ====
    [source,bash,subs="+quotes"]
    ----
    swaks ##--server smtp.example.org --port 465## \
          --from info@example.org --to admin@example.org
    ----
    ====
    
    IMPORTANT: On the host these should work. However, make sure that they
    fail if you try them from another server. If they don't fail, then
    everyone can use your SMTP server to send emails, and this is
    wrong. Something is wrong with the configuration of the server.
    
    [TIP]
    ====
    To allow a server to send emails from your SMTP, you should append its
    IP to the list of the trusted hosts:
    
    [source,bash,subs="+quotes"]
    ----
    echo '11.12.13.14' >> config/trusted_hosts
    ds inject update.sh
    ----
    ====
    
    == Check the health of the mail server
    
    * Send an email to `check-auth@verifier.port25.com`:
    +
    [source,bash,subs="+quotes"]
    ----
    swaks --server smtp.example.org -tlso \
          --from info@example.org \
          --to ##check-auth@verifier.port25.com##
    ----
    +
    The automatic reply will give you important information about the status
    and health of your email server (for example whether the mails sent from
    it pass the SPF and DKIM checks, whether they are considered spam or
    not, etc.)
    
    * Go to https://www.mail-tester.com/ and send a message to the email
    address displayed there, like this:
    +
    [source,bash,subs="+quotes"]
    ----
    swaks --server smtp.example.org -tlso \
          --from info@example.org \
          --to ##test-1p4f6@mail-tester.com##
    ----
    +
    Then click the button for checking the score.
    
    * There are lots of other tools and websites that help to check the
    configuration of a mail server (DNS settings, configuration, security
    features, etc.) For example:
    ** https://ns.tools
    ** https://mxtoolbox.com/
    
    == Add another email domain
    
    This smtp server can support more than one mail domains. If we want to
    add another mail domain, for example `example##.com##`, we have to do these:
    
    . Set DNS configurations like this:
    +
    [source,subs="+quotes"]
    ----
    ; mail for example.com
    smtp.example.com.   IN   CNAME    smtp.example##.org##.
    example.com.    IN    MX    10    smtp.example.com.
    example.com.    IN    MX    20    smtp.example.com.
    example.com.    IN    TXT         "v=spf1 mx -all"
    ----
    +
    Note that the first record (`CNAME`) redirects the new smtp domain to
    the first one.
    +
    You can check these DNS configurations like this:
    +
    [source,bash]
    ----
    dig +short smtp.example.com. A
    dig +short example.com. MX
    dig +short example.com. TXT
    ----
    
    . Edit [path]`settings.sh` and add the new domain at
    [var]`VIRTUAL_DOMAINS`:
    +
    [source,bash,subs="+quotes"]
    ----
    VIRTUAL_DOMAINS='
        example##.org##
        example##.com##
    '
    ----
    
    . Run [cmd]`ds make` to rebuild the container. The rebuild is done
    because we need to request a new SSL cert from letsencrypt, which
    covers all the domains (including the new one).
    
    . Go to http://dmarc.postmarkapp.com/ and generate a DMARC record for
    the new domain.
    
    . Update the DNS configuration with records like these:
    +
    ....
    mail._domainkey.example.com.  IN  TXT  (
        "v=DKIM1; h=sha256; k=rsa; "
        "p=MIIBIjANBgkqhkiG9w0BAQE....kMJdAwIDAQAB"
    )
    
    _dmarc.example.com.           IN  TXT  (
        "v=DMARC1; p=none; pct=100; "
        "rua=mailto:re+x2i0yw1hoq7@dmarc.postmarkapp.com; sp=none; aspf=r;"
    )
    ....
    +
    Note that:
    +
    --
    * The value of the key for the DKIM record can be found on the file:
    [path]`config/dkim-keys/example.com/mail.txt`
    
    * The value of the DMARC record is the one obtained on the previous
    step.
    
    You can check them like this:
    
    [source,bash]
    ----
    dig +short mail._domainkey.example.com. TXT
    dig +short _dmarc.example.com. TXT
    ----
    --
    
    == Relay domains
    
    If another mail server is installed on the same machine where this
    SMTP server is installed, there is a problem, because they both need
    to use the port **`25`** for receiving mails. SMTP ports cannot be
    shared by more than one application, and it is not possible to proxy
    them (like HTTP or HTTPS ports, for example).
    
    A workaround in this case would be to use this simple SMTP server as a
    relay for the mail domains that are served by the other mail
    server. It works like this:
    
    1. When a connection comes on the port **`25`** (someone is trying to
    send an email), it is handled by the simple SMTP server, since this
    port is forwarded to this server.
    2. If the domain of the receipient's address is one of the domains
    that is managed by the simple SMTP server, the mail is handled by this
    server itself.
    3. Otherwise, if the domain is one of those that are managed by the
    other mail server, it is relayed instead to that mail server.
    
    In other words, the simple SMTP server behaves like a kind of router
    for the emails that are received, based on the email domain of the
    receipent's address.
    
    Let's see how to implement this SMTP relay. We will assume that the
    domains that are managed by the other mail server are `example1.org`,
    `example2.org` and `example3.org`. We can create the custom command
    [cmd]`ds relay-setup` like this:
    
    [source,bash]
    ----
    cd /var/ds/smtp.example.org/
    mkdir -p cmd
    
    cat <<'__EOF__' > cmd/relay-setup.sh
    cmd_relay-setup() {
        # create a config file for relay_domains
        cat <<EOF > config/relay_domains
    example1.org
    example2.org
    example3.org
    EOF
    
        # create a config file for transport_maps
        local smtp_relay='smtp:10.214.77.201:25'    (1)
        cat <<EOF > config/transport_maps
    example1.org    $smtp_relay
    example2.org    $smtp_relay
    example3.org    $smtp_relay
    EOF
    
        # setup transport_maps
        ds exec postconf -e 'transport_maps=hash:/host/config/transport_maps'
        ds exec postmap /host/config/transport_maps
    
        # setup relay_domains
        ds exec postconf -e relay_domains=/host/config/relay_domains
    
        # reload postfix configuration
        ds exec postfix reload
    }
    __EOF__
    
    cat cmd/relay-setup.sh
    ----
    
    <1> We assume that `10.214.77.201` is the internal (fixed) IP of the
    other mailserver.
    
    In order to call this command automatically whenever we rebuild the
    container, we can override the command [cmd]`ds config` like this:
    
    [source,bash]
    ----
    cat <<'EOF' > cmd/config.sh
    rename_function cmd_config standard_config
    cmd_config() {
        standard_config
        ds relay-setup
    }
    EOF
    
    cat cmd/config.sh
    ----

7. AsciiDoc tutorials

AsciiDoc is a plain text markup language for writing technical content. It can be as powerful as DocBook, and as simple as Markdown, depending on your needs.

8. Customizations

Antora has a clear separation between the content and the presentation. The look of the site is defined by the ui-bundle:

ui:
  bundle:
    #url: https://gitlab.com/antora/antora-ui-default/-/jobs/artifacts/master/raw/build/ui-bundle.zip?job=bundle-stable
    #url: https://github.com/mulesoft/docs-site-ui/releases/download/prod-28/ui-bundle.zip
    url: ./ui-bundle.zip
    snapshot: true
  supplemental_files: ./ui-supplemental
  output_dir: ui

However we can override and/or extend the default templates by the files on the directory ui-supplemental/:

ui-supplemental
├── css
│   ├── custom.css
│   └── search.css
├── img
│   ├── icon
│   │   └── favicon.ico
│   └── lugbz-logo.png
├── js
│   ├── medium-zoom.config.js
│   ├── search-ui.js
│   └── vendor
│       └── medium-zoom.min.js
├── partials
│   ├── footer-content.hbs
│   ├── footer-scripts.hbs
│   ├── header-content.hbs
│   ├── head-icons.hbs
│   ├── head-styles.hbs
│   ├── nav.hbs
│   ├── nav-menu.hbs
│   └── toolbar.hbs
└── ui.yml